Phatch : A pretty good image batch ( watermark ) processing
 Hi all,
I have been using phatch for many times but never had the time to write about this. No, this is not a review. This is merely a personal experience record.
First of all, what is PHATCH?
From Wikipedia [link]
A simple explaination ; I use phatch to insert watermark effect on my photos!
Phatch (PHoto & bATCH) is a raster graphics editor used to batch process a lot of digital graphics and photographs at once. Typical uses include resizing, rotating, cropping, converting, applying shadows, rounded corners, perspective, reflection and converting between different image formats. It is ideal for creating web graphics and for people not wanting to learn complex editors like the GIMP or Photoshop. Phatch can also be used to rename or copy image files based on the exif or IPTC Information Interchange Model tags.
Anyway, enough talk, let see how you can get patch and use it.
To install phatch.
1. Open Add/Remove...

2. Please update the package list first if you have not do so. To do this click Reload.

3. Wait for all packages list to be updated. It will take a moment depending on your internet connection speed.

4. Please change the view from Supported Application to All Available Application


5. Key in phatch in the search box.

6. Tick on the little box to choose it.

7. Click Apply Changes.

8. Click Apply to install.

9. Phatch will be automatically downloaded and installed in a few minutes.

10. Click Close to continue and close Add/Remove....

Now to use phatch!
1. Click Applications - Graphic - Phatch Photo Batch Processor

2. Phatch will be opened.

3. To get started, click on the + sign.

3. Click on the effects you want. In this case, round corner effect, shadow effect and watermark effect. Click Add to use the effect.


4. Click on the + sign again to add effects.

5. You can click - sign to remove the effects.

6. Repeat the step to add watermark effect.

7. Remember to add Save command at the end of the batch process.

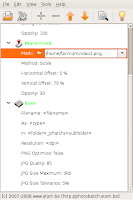
8. For Watermark Effect, you have to prepare an image to be the watermark itself. If you already have the image, just click on the Mark field and click on the Folder Icon to browse for your image. Adjust the other settings accordingly. You have to try each setting to fit your need later.

9. Choose the image to be the watermark.

10. If everything is going according to plan, click the Gears icon to start processing the images.

11. Click on the Browse Folder button to browse for the folder where your images reside.

12. Pick the images folder. Click Open.

13. Click Batch.

14. The phatched images will be put into a new folder on the desktop.

Although this should be easy, I think adjusting the watermark option is somewhat very annoying. It is hard to do it when there are no preview available. You have to try and retry to get the suitable positions.


phatch
ReplyDeletetest phatch
ReplyDelete